

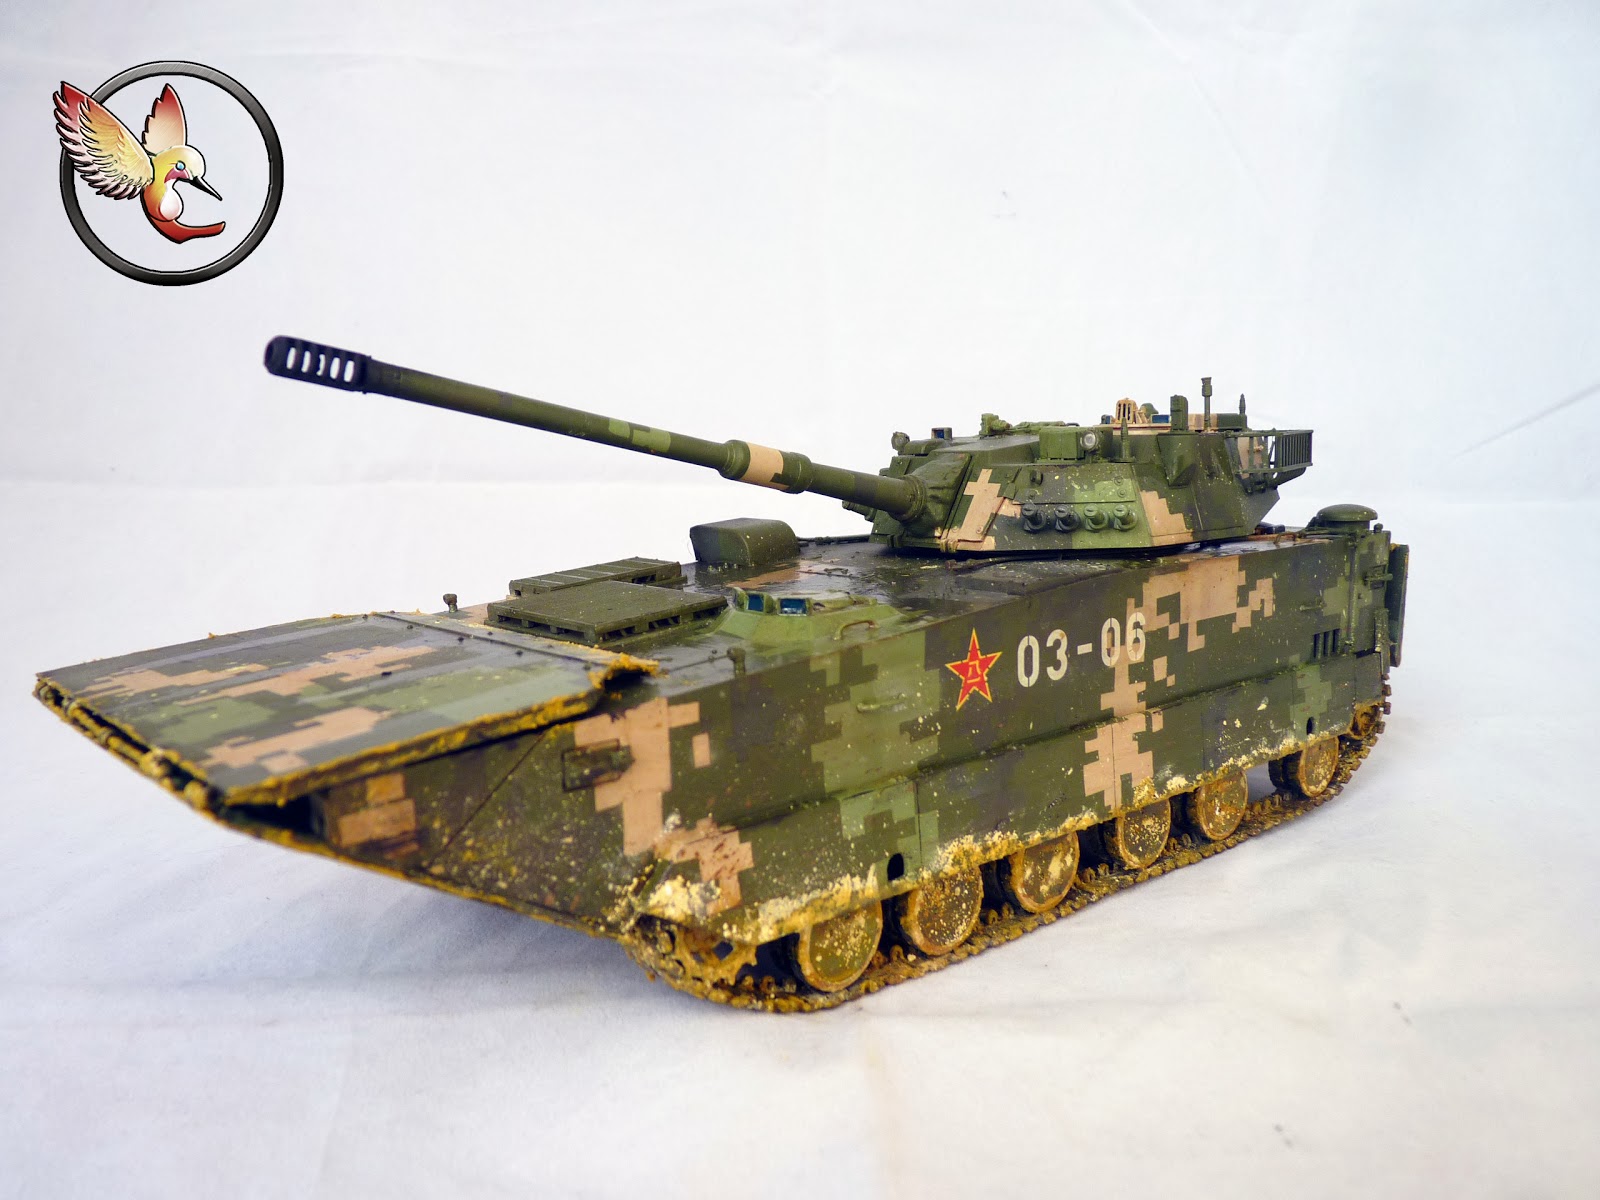
Well, here comes yet another finished kit from me. This time, I will be adding a kit most modeller won't touch usually. It's a rather peculiar looking vehicle as well. This is a ZTD-05 AAAV from hobbyboss, released in mid( I think ) 2012.
The ZTD-05 is an amphibious assault tracked armoured vehicle designed and manufactured in China. The ZTD-05 belongs to the series of amphibious vehicles developed by China. The ZTD-05 is a regarded as a light tank due to its firepower. It is the fastest and most advanced medium-sized AAV. The ZTD-05 was designed for China by the Tula KBP bureau, using the fighting compartment of the Russian BMP-3 armoured infantry fighting vehicle as the starting point.
The light tank variant is armed with a fully stabilised 105mm rifled gun. The 105mm rounds carried consist of armour piercing fin stabilised discarding sabot (APFSDS), high explosive (HE), and high-explosive anti-tank (HEAT) rounds, and Chinese 105mm laser beam riding guidance anti-tank guided missile (ATGM). The 105mm missile offers the capability to engage shore targets whilst still swimming at sea, where conventional ammunition would perform poorly due to the motion of sea waves.
More info here -
http://en.wikipedia.org/wiki/ZBD2000
http://www.armyrecognition.com/china_chinese_heavy_armoured_vehicle_tank_uk/ztd-05_amphibious_assault_armoured_vehicle_technical_data_sheet_information_description_intelligence.html
I don't have any major gripe about the kit. As expected from hobbyboss, the kit is moulded sharply and the fit are quite nice. The only thing I am not happy about is the track, which is a really pain in the back side to put on. The front bow wave plates ( or what ever they are called ) can be made to be workable, which I did but I don't know what went wrong, it wasn't folding down to the top of the hull properly, leaving a huge gap and after spending 3 evenings to try to make it workable, I just decided to just glue the damn thing down.
The build was enjoyable, apart from the time the front flaps and the tracks give me trouble. I made a full account of the W.I.P in the previous posts and you are welcome to look over at them if you are curious about how well the kit goes together. Actually, let me make a list here for the Work in Progress posts -
I painted this all in Gunze Sanyo, Mr. Colour Aqueous colours ; H313, H312 , H303 and H309. This is my first time I used Mr. Colour and I have to admit, I kinda like it. A little bit tricky to think but covers very good nevertheless. I went for the digital camo scheme as I don't really do that and now is the perfect chance to do one as I have the option to do so.
For weathering, I kept it rather clean apart from the various dried and wet sand. I did put on a fair amount of chippings on the front and rear plates and along the side skirts. I thought those areas would be chipped more then the rest of the vehicle with the vehicles coming out of the assault ships and going through the shore lines where reefs or rocks on the shallow sea bed or beach might chip away the paint. I'm kinda not happy with the sand effect. It was my first time doing this and it was very hard for me to make clumps of wet sand. The pigments are from MIG and they change colour quite drastically when fixed with thinner. Oh well.. I will just take it as a valuable lesson for my next amphibious projects. The wet effects were done with Tamiya Clear Gloss and Vallejo Clear Varnish. I was broke and couldn't afford dedicated wet effect fluids so I just had to resort to the gloss paints. They actually work pretty well.
Well, that's about as much I can sum up about the build. The exact steps can be found in the 5-part W.I.P.
I'm vary satisfied with what I did, albeit it could look better but still, I'm happy.
It's time for the photos -
(If you think some are small, just click on them ) 


Close ups on the vision periscope -


The only three on-board tools

And some of the close ups of the water and sand splatter -


And as usual, my show case photos from various angles -


And as usual from me -

To be honest, I am not particularly fond of my own paint job on this. This is a bit of self-criticism from me: I was very impatient and some of the pattern are crooked. I had a hard time cutting the bloody masks out ...... GRRRRRR, the horror...
I know I still have a long way to go to be classed as one of the masters and I won't stop until I reach that kind of level. I couldn't keep building if not for my supporting friends and comrades. Thank you guys for always supporting me. Thank you dear readers for your patronage as well.
Until Next time.
Wow... thank you soo much .... for such a nice feedback.... I have problems doing clumps .. I just don't know how to do it and it don't come out very well... I have the acrylic resin which doesn't work that well... I am now gonna get my hands on some plaster to make some volume and clumps...
ReplyDeleteI honestly don't know anything about Solvaset so thanks for the heads-up about that product.
I woke up and saw this nice feedback and it made my morning...
thank you