
I would like to show you my second finished kit in the year 2014 and my second diorama in life.
This is a Dragon 3-in-1 I bought from a fellow member in a forum and and as I have seen to build it quite nicely, according to my friends, I wanted to make a diorama for it.
The kit is really great but as this is a 3in1 kit, Dragon put in all options for all 3 version in the same instruction and it was very much crammed and so hard to understand and read. There was a lot of leftover parts from the other two versions ( from other panzer IV sprues as well ) that was just annoying.
I painted the vehicle all in Tamiya; Dark Yellow, Olive Green and Red Brown ( I can't be bothered to mix my own shade ).
I thought of putting on mud but I decided to put on just dirt, dust and dry soil as I want to depict this vehicle in a summer condition. The pigments on the side of the chassis were applied dry and fixed with Tamiya thinner. The dusty appearance on the front glacis was applied first with two layer of oil wash and brushing pigments on top after that.
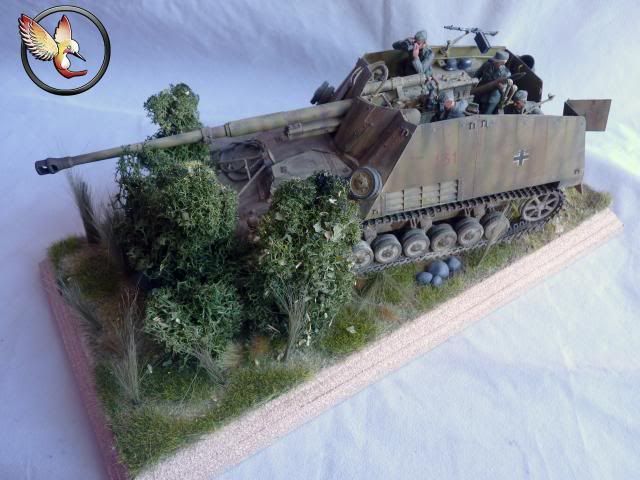
The Diorama is build on a pre-made base which I bought from Telford last year. The ground work is a glue on mat with grass already on it. I didn't want the ground work to be flat so before gluing down the grass-mat, I applied various patches of plaster for irregularities in the terrain to make it more natural. The long grasses are from Woodland Scenic. I also put on some of the dried out grass patch from Game workshop to give the ground work a bit more visual interest. The bush was made by gluing lichen on brass rods that is worked into a plaster base for easier applications and for stability.
The crew's face were painted with Vallejo colours and the uniform as well. I still have a hard time painting shadows in the creases but I getting better at dry brushing lighter tones on top.
The Crew is a dedicated crew for a Nashorn from Tristar. It's very hard to find these crews these days. I was lucky enough to find one. The figures are very lovely and casted very nicely. It even comes with two brass round - a 88mm and 75mm ( for the Marder, I believe)
The build was very enjoyable. I made a full account of the W.I.P in the previous posts and you are welcome to look over at them if you are curious about how well the kit goes together. Actually, let me make a list here for the Work in Progress posts -
Part 5
Well, that's about as much I can sum up about the build. The exact steps can be found in the 6-part W.I.P.
Well, that's about as much I can sum up about the build. The exact steps can be found in the 6-part W.I.P.
I'm vary satisfied with what I did ( on the tank), albeit it could look better but still, I'm happy. I am however, very unhappy of the figures and the sorry state it is in. I do love the uniform though.
I did not glue down the vehicle so that I can take photos separately before taking the whole diorama.
First, the vehicle -


 Some angle shots -


 Some close ups on the wheels and running gears -


 The rust on the exhaust -


Some shots of the crews -


 Some of the tools and bibs and bobs -


The stand-alone diorama -


 And here is the whole diorama -


To be honest, I am not particularly fond of some small hiccups on this. This is a bit of self-criticism from me: I was very impatient and it shows. My figure painting skills still sucks (BIG TIME). This is my first time doing a diorama so the bush was not exactly that nice or realistic as I have envisioned. Painting shoulder badges were out of my abilities so I could only paint a smell strip of black just to imply that it is there. I am not fond of that development. I realized only too late that in some area, the infernal matt varnish has frosted.
Apart from those mishaps and problems, I am very very fond of this build. I think I built the diorama quite nicely for my very second time and I really like how the Nashorn herself looks.
It's time for the photos -
(If you think some are small, just click on them ) I did not glue down the vehicle so that I can take photos separately before taking the whole diorama.
First, the vehicle -
To be honest, I am not particularly fond of some small hiccups on this. This is a bit of self-criticism from me: I was very impatient and it shows. My figure painting skills still sucks (BIG TIME). This is my first time doing a diorama so the bush was not exactly that nice or realistic as I have envisioned. Painting shoulder badges were out of my abilities so I could only paint a smell strip of black just to imply that it is there. I am not fond of that development. I realized only too late that in some area, the infernal matt varnish has frosted.
Apart from those mishaps and problems, I am very very fond of this build. I think I built the diorama quite nicely for my very second time and I really like how the Nashorn herself looks.
Thank you guys for always supporting me. Thank you dear readers for your patronage as well.
Until Next time.
If you have any suggestion, comments and feedback, you know what to do people. Thank you in advance.
0 comments:
Post a Comment